Background
In August, I embarked on a new journey by joining a new company, marking the start of another exciting venture. At the same time, I began exploring the world of data — an area full of concepts and tools I had never worked with before. This blog is part of my effort to document that learning process. In particular, I want to share how to build a small, local data solution — complete with authentication — that can run on your own local instance.
Prerequisites
Before jumping into the details, it’s important to have a basic understanding of the three core services we’ll be working with. Below, I’ll provide a brief introduction to each of them.
CloudBeaver
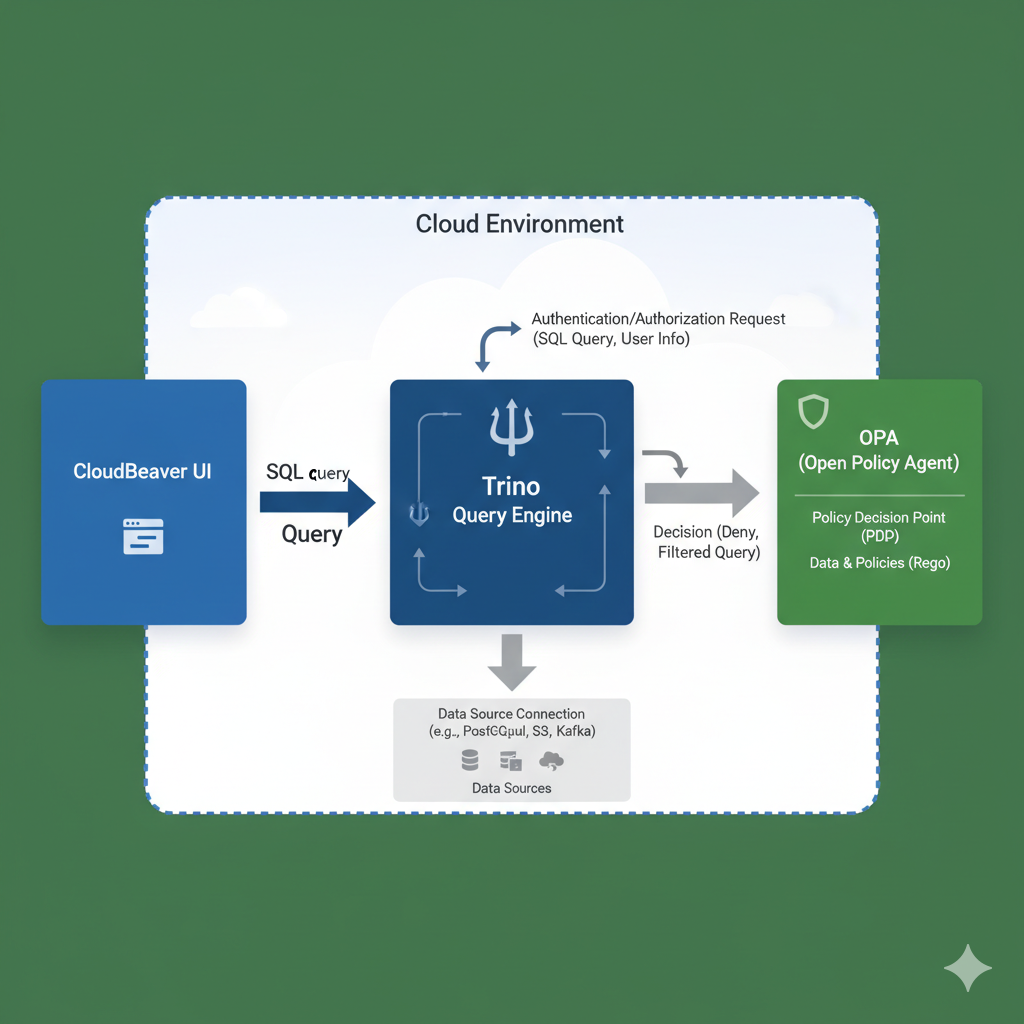
CloudBeaver is a lightweight, web-based database management tool. It allows you to connect to multiple databases through a browser interface, making it easy to explore data, run queries, and manage database objects without installing heavy desktop software. In our setup, CloudBeaver will serve as the main interface to interact with Trino.
Trino
Trino is a high‑performance, distributed SQL query engine designed to run interactive queries at scale. It can connect to a wide variety of data sources — from relational databases like Postgres and MySQL to big data systems and even object storage. In our local setup, Trino serves as the query engine sitting between CloudBeaver (the UI) and the underlying data sources. This means CloudBeaver sends SQL queries to Trino, and Trino takes care of planning, executing, and returning the results.
OPA (Open Policy Agent)
OPA is a general-purpose policy engine that helps enforce fine-grained access control. It uses a declarative policy language called Rego to define what actions are allowed or denied. In our local data solution, OPA will integrate with Trino to ensure that only authorized users can run certain queries or access specific rows of data.
Arch
Based on the image below, you can easily understand the roles and responsibilities of these three services. In the next section, we will walk through how to use these services step by step to build a modern distributed SQL query engine for processing large volumes of data.
Setup
We use Docker Compose to orchestrate the three core services (Trino, CloudBeaver, OPA) for this demo project
services:
  trino:
    image: trinodb/trino:latest
    container_name: trino
    ports:
      - "8080:8080"
    volumes:
      - ./trino/etc:/etc/trino
      - ./trino/data:/data/trino

  cloudbeaver:
    image: dbeaver/cloudbeaver:latest
    container_name: cloudbeaver
    ports:
      - "8978:8978"
    volumes:
      - ./cloudbeaver/workspace:/opt/cloudbeaver/workspace
    depends_on:
      - trino

  opa:
    image: openpolicyagent/opa:0.69.0
    container_name: opa
    ports:
      - "8181:8181"
    command: ["run", "--server", "--addr", "0.0.0.0:8181", "--config-file", "/config.yaml", "--log-level", "debug", "/policy", "/data"]
    volumes:
      - ./opa/policies:/policy
      - ./opa/data:/data
- ./opa/config.yaml:/config.yamlCloudBeaver
CloudBeaver setup is the simplest part. All we need to do is create a folder that Docker Compose can mount, which will be used to store logs and authentication information.
$ mkdir -p cloudbeaver/workspaceTrino
Trino is the heart of the stack, so its setup is a bit more involved than the others. We keep everything under a trino/directory with two subfolders: etc/ for configuration and data/ for runtime state.
trino/etc/ — Configuration
Mounted at /etc/trino/ inside the container. Key files include:
config.properties– Main server settings (coordinator role, memory limits, discovery URI)node.properties– Node-specific configurationjvm.config– JVM flags and memory optionslog.properties– Logging levelsaccess-control.properties– Points Trino to OPA for policy decisionspassword-authenticator.properties– Enables file-based password authenticationpassword.db– Local credential storecatalog/tpch.properties– TPCH sample dataset connectorcatalog/memory.properties– In-memory connector for quick tests
trino/data/ — Runtime Data
Mounted at /data/trino/ inside the container. Used for:
var/log/– HTTP and query logsvar/run/launcher.pid– Process ID of the Trino server- Cache and temp files for query execution
This directory ensures Trino can persist logs, state, and temp files across restarts.
Example Config Files
etc/access-control.properties
access-control.name=opa
opa.policy.uri=http://opa:8181/v1/data/authz/trino/allow
opa.policy.batched-uri=http://opa:8181/v1/data/authz/trino/batch_allow
opa.log-requests=true
opa.log-responses=trueetc/config.properties
coordinator=true
node-scheduler.include-coordinator=true
http-server.http.port=8080
query.max-memory=512MB
query.max-memory-per-node=256MB
discovery-server.enabled=true
discovery.uri=http://localhost:8080etc/jvm.config
-server
-Xmx1G
-XX:+UseG1GC
-XX:G1HeapRegionSize=32M
-XX:+UseGCOverheadLimit
-XX:+ExplicitGCInvokesConcurrent
-XX:+HeapDumpOnOutOfMemoryError
-XX:+ExitOnOutOfMemoryErroretc/log.properties
io.trino.plugin.opa.OpaHttpClient=DEBUGetc/node.properties
node.environment=dev
node.id=1
node.data-dir=/data/trinoetc/password-authenticator.properties
password-authenticator.name=file
file.password-file=/etc/trino/password.dbetc/password.db
alice:password123
bob:password123Next, let’s introduce the concept of catalogs in Trino.
In Trino, a catalog is a named configuration that connects to a specific data source. Each catalog:
- Points to a different data source (e.g., a database, file system, etc.)
- Uses a specific connector to communicate with that data source
- Has its own configuration settings
- Appears as a separate “database” when queried via SQL
In this demo, we’ll use two catalog configurations. Here’s the first:
1. tpch.properties — TPCH Connector
- Purpose: Provides sample datasets for testing and demonstration purposes
- Connector: TPCH (Transaction Processing Performance Council)
- Data: Dynamically generates standard benchmark tables such as customer, orders, lineitem, and more
- Configuration:
splits-per-node=4— Controls the level of parallelism used during data generation
etc/catalog/tpch.properties
connector.name=tpch
tpch.splits-per-node=42. memory.properties - Memory Connector
- Purpose: Creates in-memory tables for temporary data storage
- Connector: Memory connector for ephemeral data
- Use case: Temporary tables, testing, or data processing pipelines
etc/catalog/memory.properties
connector.name=memoryOPA
Next we configure OPA. Create an opa/ folder and add a trino.rego file to define authorization rules.
package authz.trino

import rego.v1

default allow := false

debug_info := {
    "user": input.context.identity.user,
    "operation": input.action.operation,
    "full_input": input,
}

# Allow Alice to perform any operation
allow if {
    input.context.identity.user == "alice"
}

# Explicitly deny Bob
allow if {
    input.context.identity.user == "bob"
    false
}

# Handle batch operations with filterResources
batch_allow := result if {
    input.action.filterResources
    result := [i |
        input.action.filterResources[i]
        allow
    ]
}

# Handle other types of batch requests
batch_allow := result if {
    input.batch
    result := [allow | input.batch[_]]
}Explanation of Rules
default allow := false– Deny by defaultdebug_info– Collects context for debugging- Alice – Full access
- Bob – Always denied
batch_allow– Applies the rules to batch requests
User Story
- Alice – Can perform any operation, always allowed.
- Bob – Always denied.
- Other users – Denied by default.
We also need to set the config.yaml for OPA.
services:
  authz:
    resource: data.authz

decision_logs:
  console: true
  reporting:
    min_delay_seconds: 1
max_delay_seconds: 1when OPA evaluates an input, it will look at the policy path data.authz (from your .rego files) to determine allow/deny or any decision output.
This section controls how OPA records and outputs decision logs (audit trail of all policy decisions).
Validation
In this section, we will run all services using Docker Compose and validate that everything works correctly. First, please make sure the folder structure matches the following:
.
├── cloudbeaver
│ └── workspace
├── docker-compose.yaml
├── opa
│ ├── config.yaml
│ └── policies
│ └── trino.rego
└── trino
├── data
└── etc
├── access-control.properties
├── catalog
│ ├── memory.properties
│ └── tpch.properties
├── config.properties
├── jvm.config
├── log.properties
├── node.properties
├── password-authenticator.properties
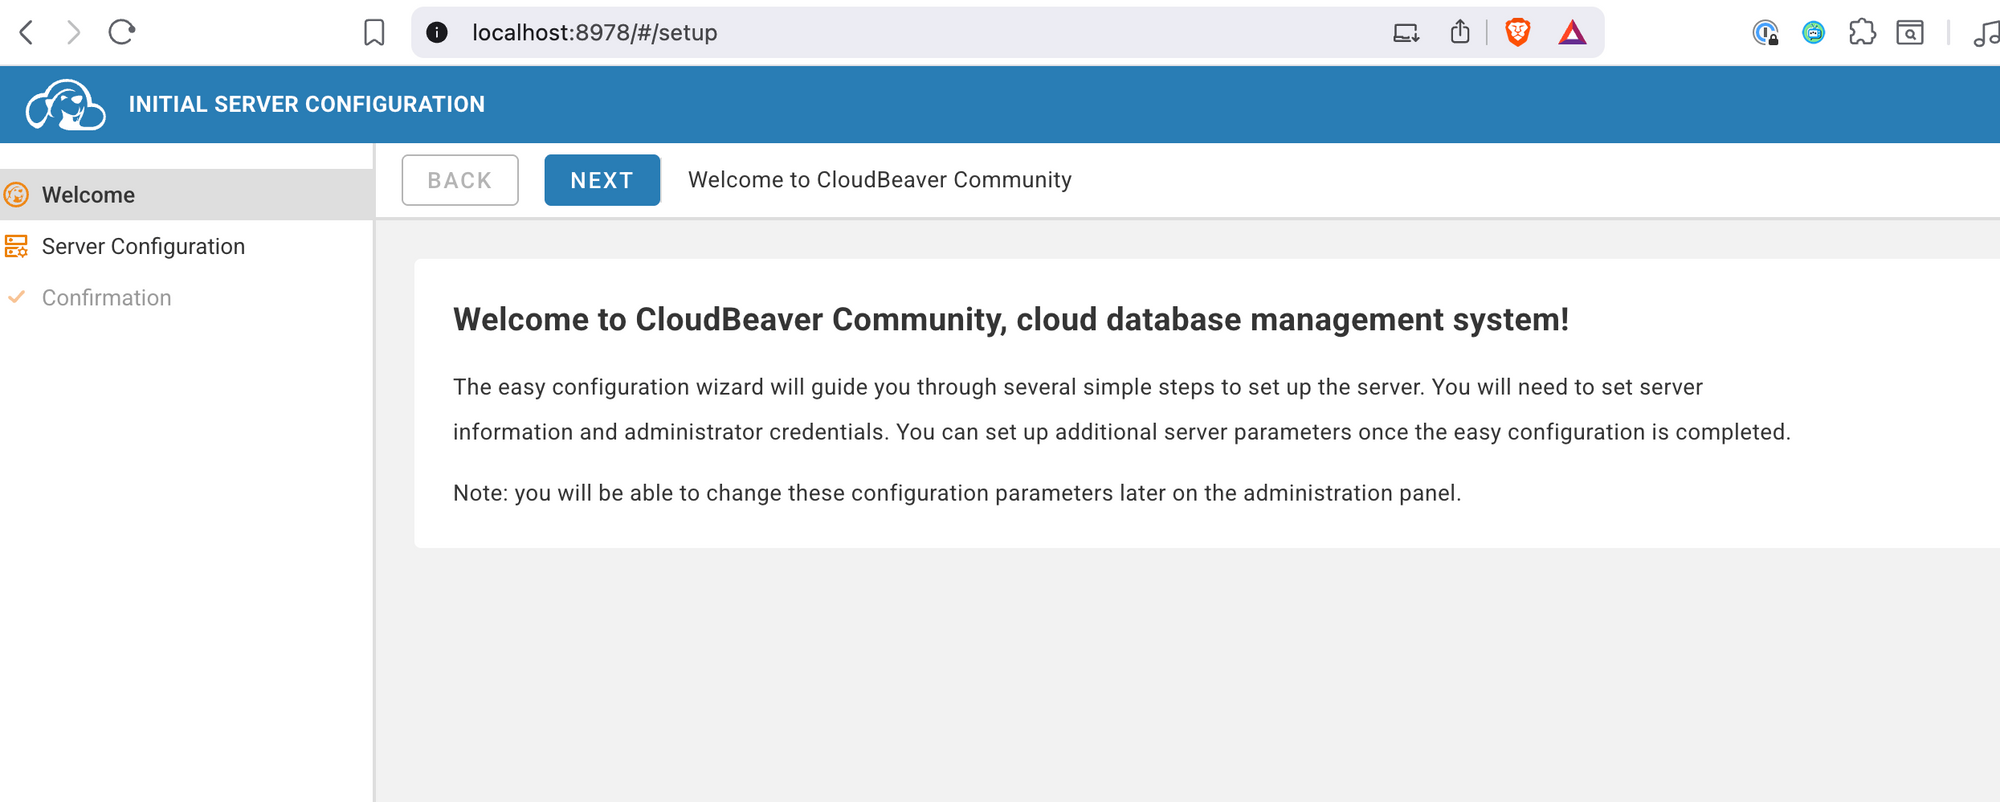
└── password.dbNext, use docker-compose up --build to start the services. If everything goes well, you can open your browser and navigate to CloudBeaver at http://localhost:8978. Follow the on-screen instructions to set up your account and password
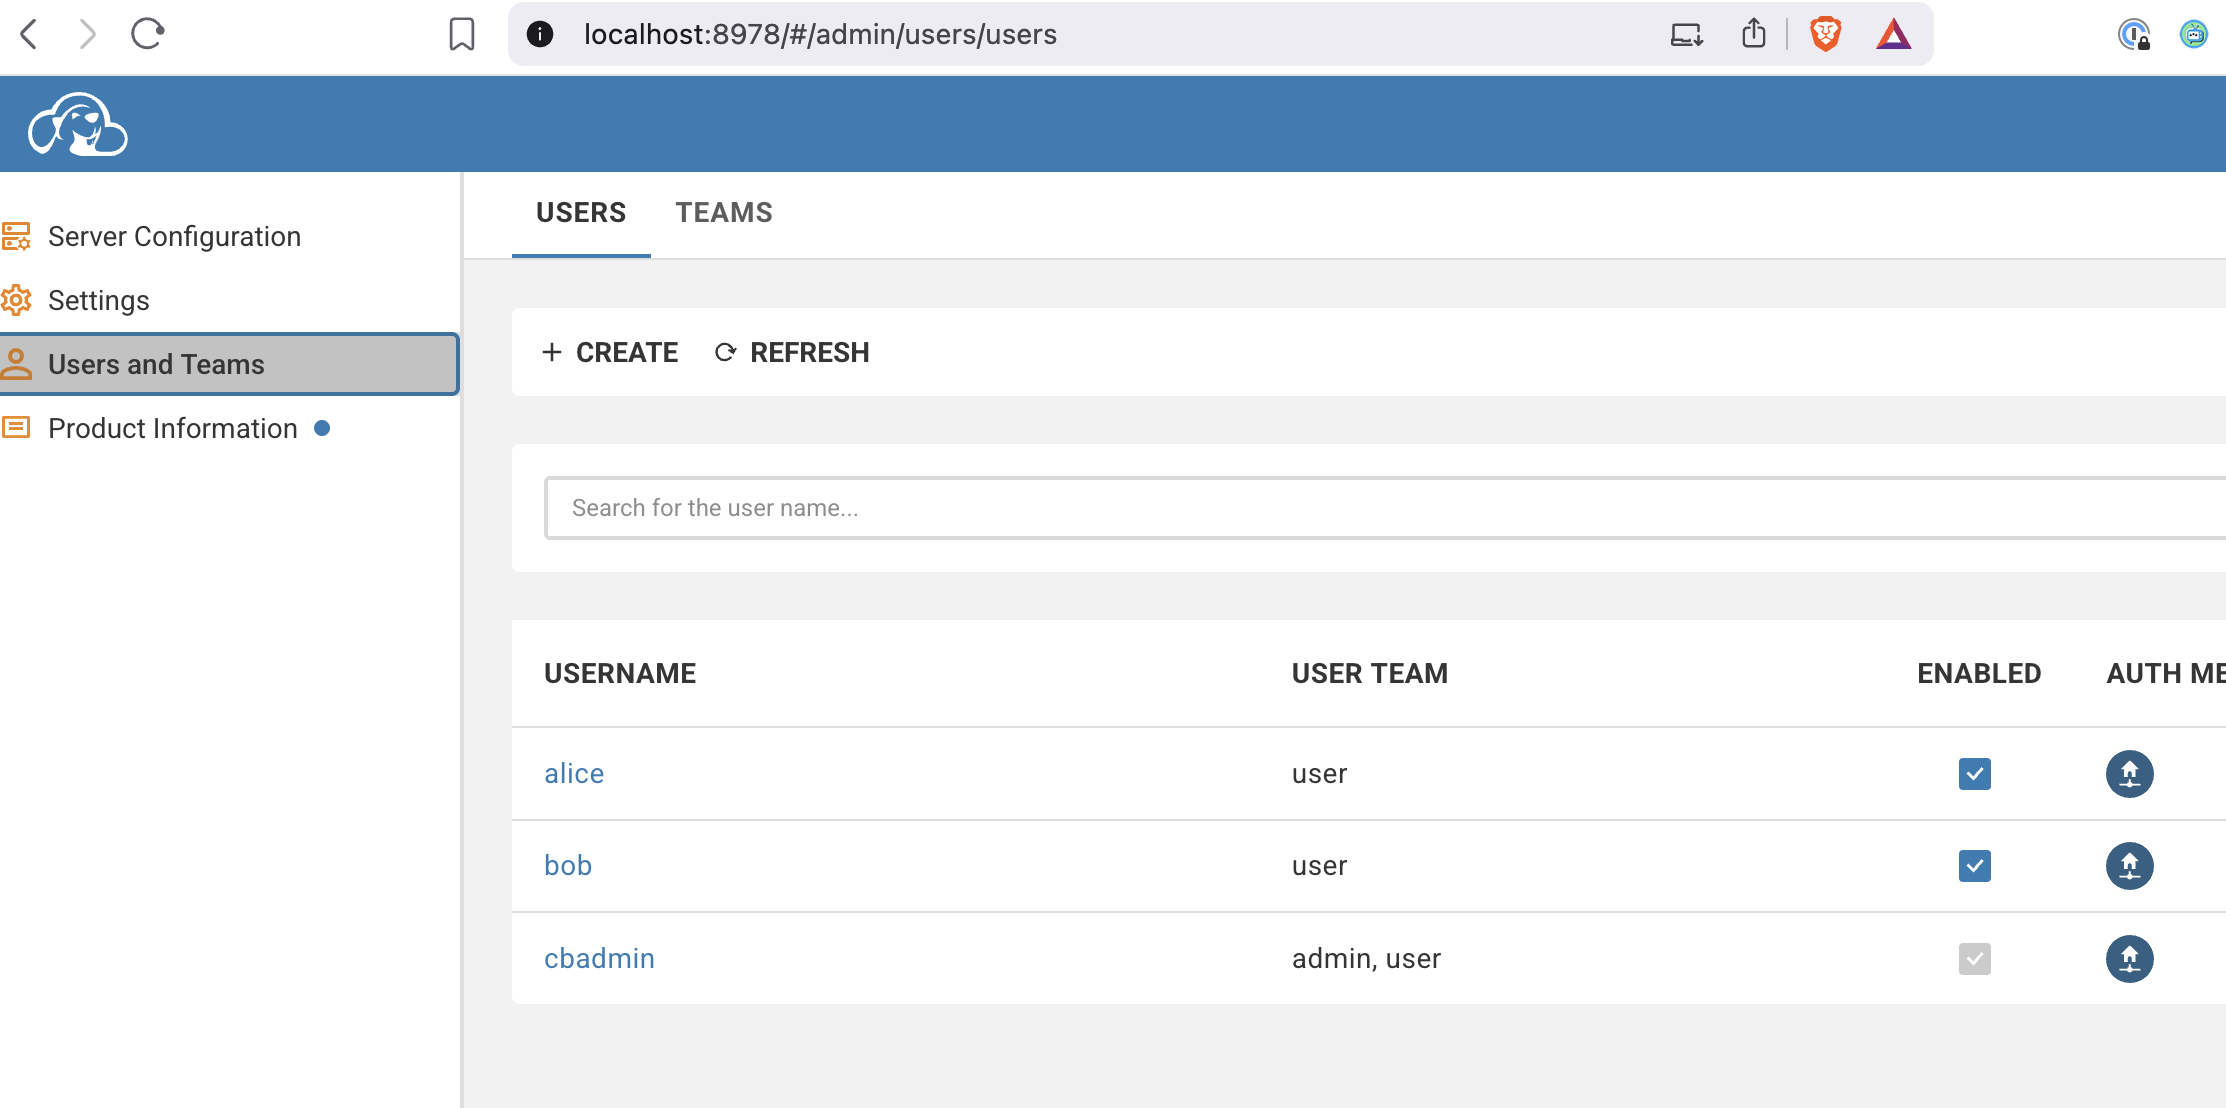
After setting up your account and password, let’s go back to our Rego code. Remember we have two users: Alice and Bob. Alice has full permissions for all operations, whereas Bob has no permissions at all. Next, we’ll test whether the OPA service is working correctly by creating these users in CloudBeaver.
Before we going to set up the connection we should describe how authentication normally works within these services:
- CloudBeaver: by default manages its own users (in its internal DB or LDAP).
- Trino: receives a username when a connection is opened. This is usually configured in the CloudBeaver connection settings (Authentication → Username/Password or JWT).
- OPA: only sees what Trino sends in input.context.identity.user.
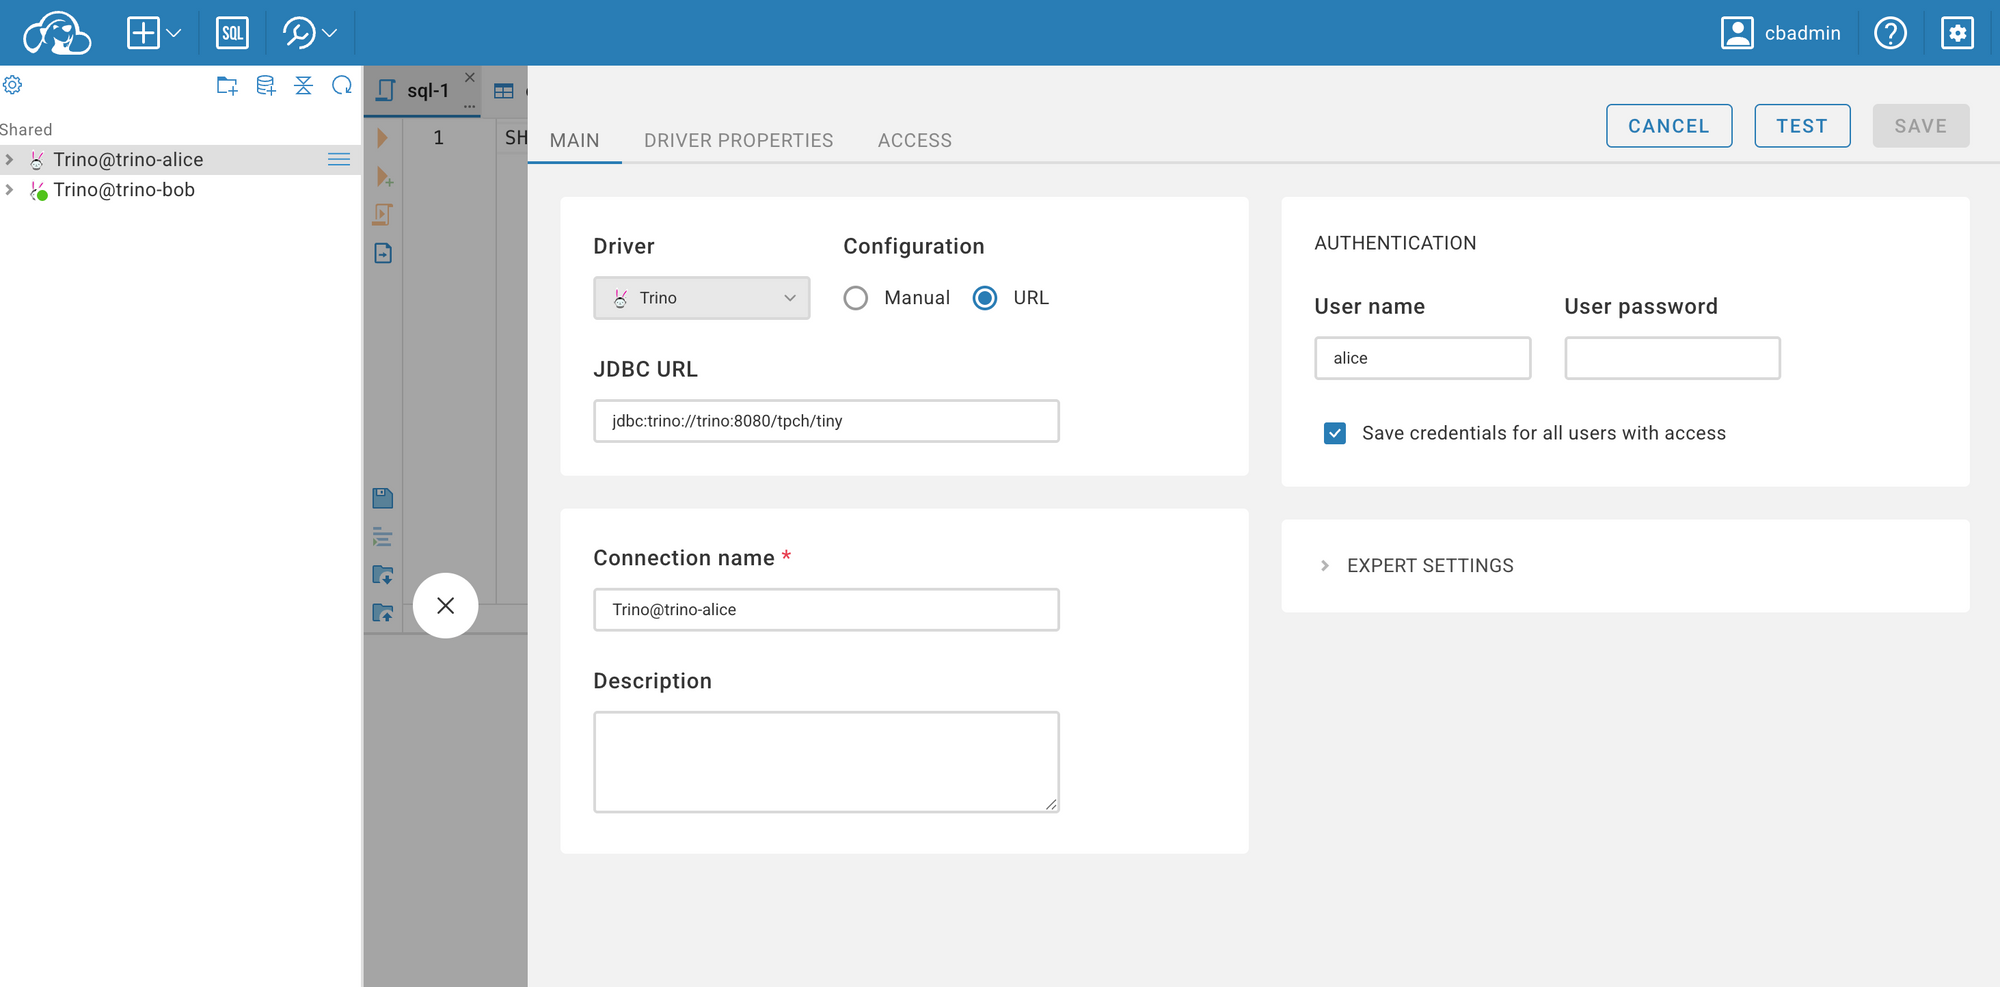
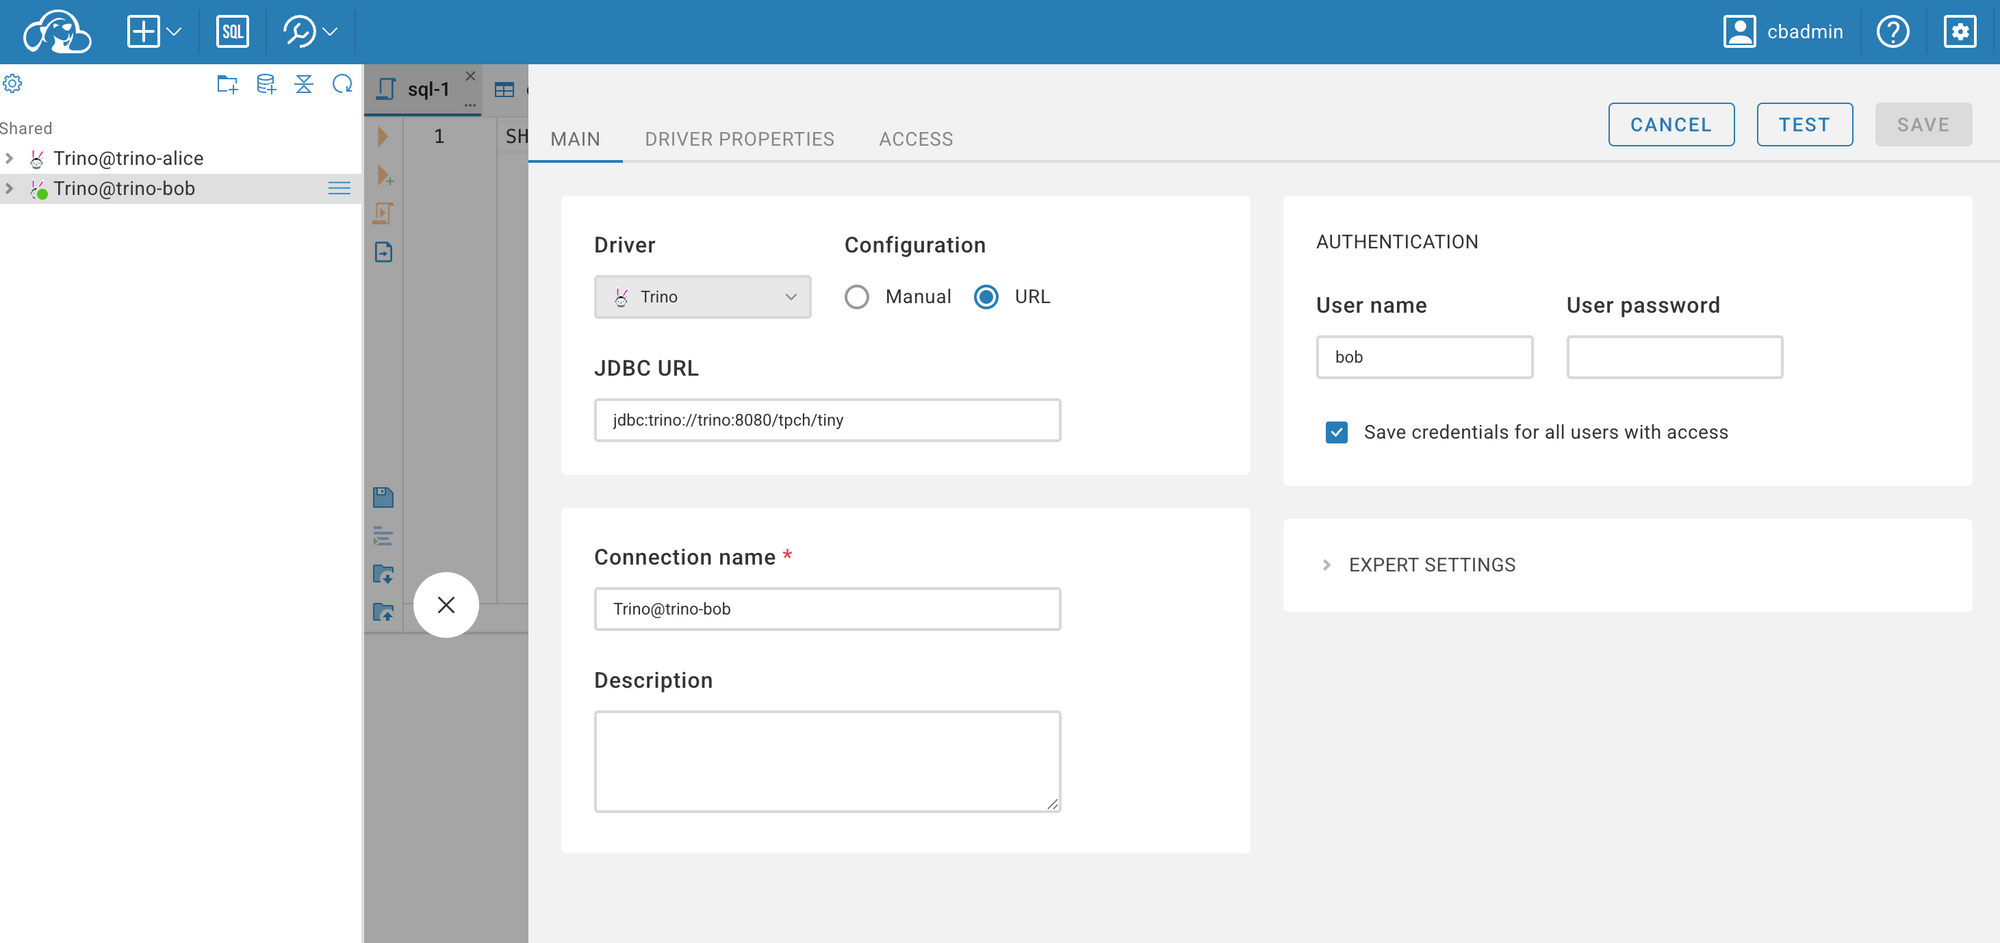
Since we're using the Community Edition of CloudBeaver, we can't automatically pass user information to Trino. As a result, each CloudBeaver user must configure their own connection using their Trino username and password (or token).
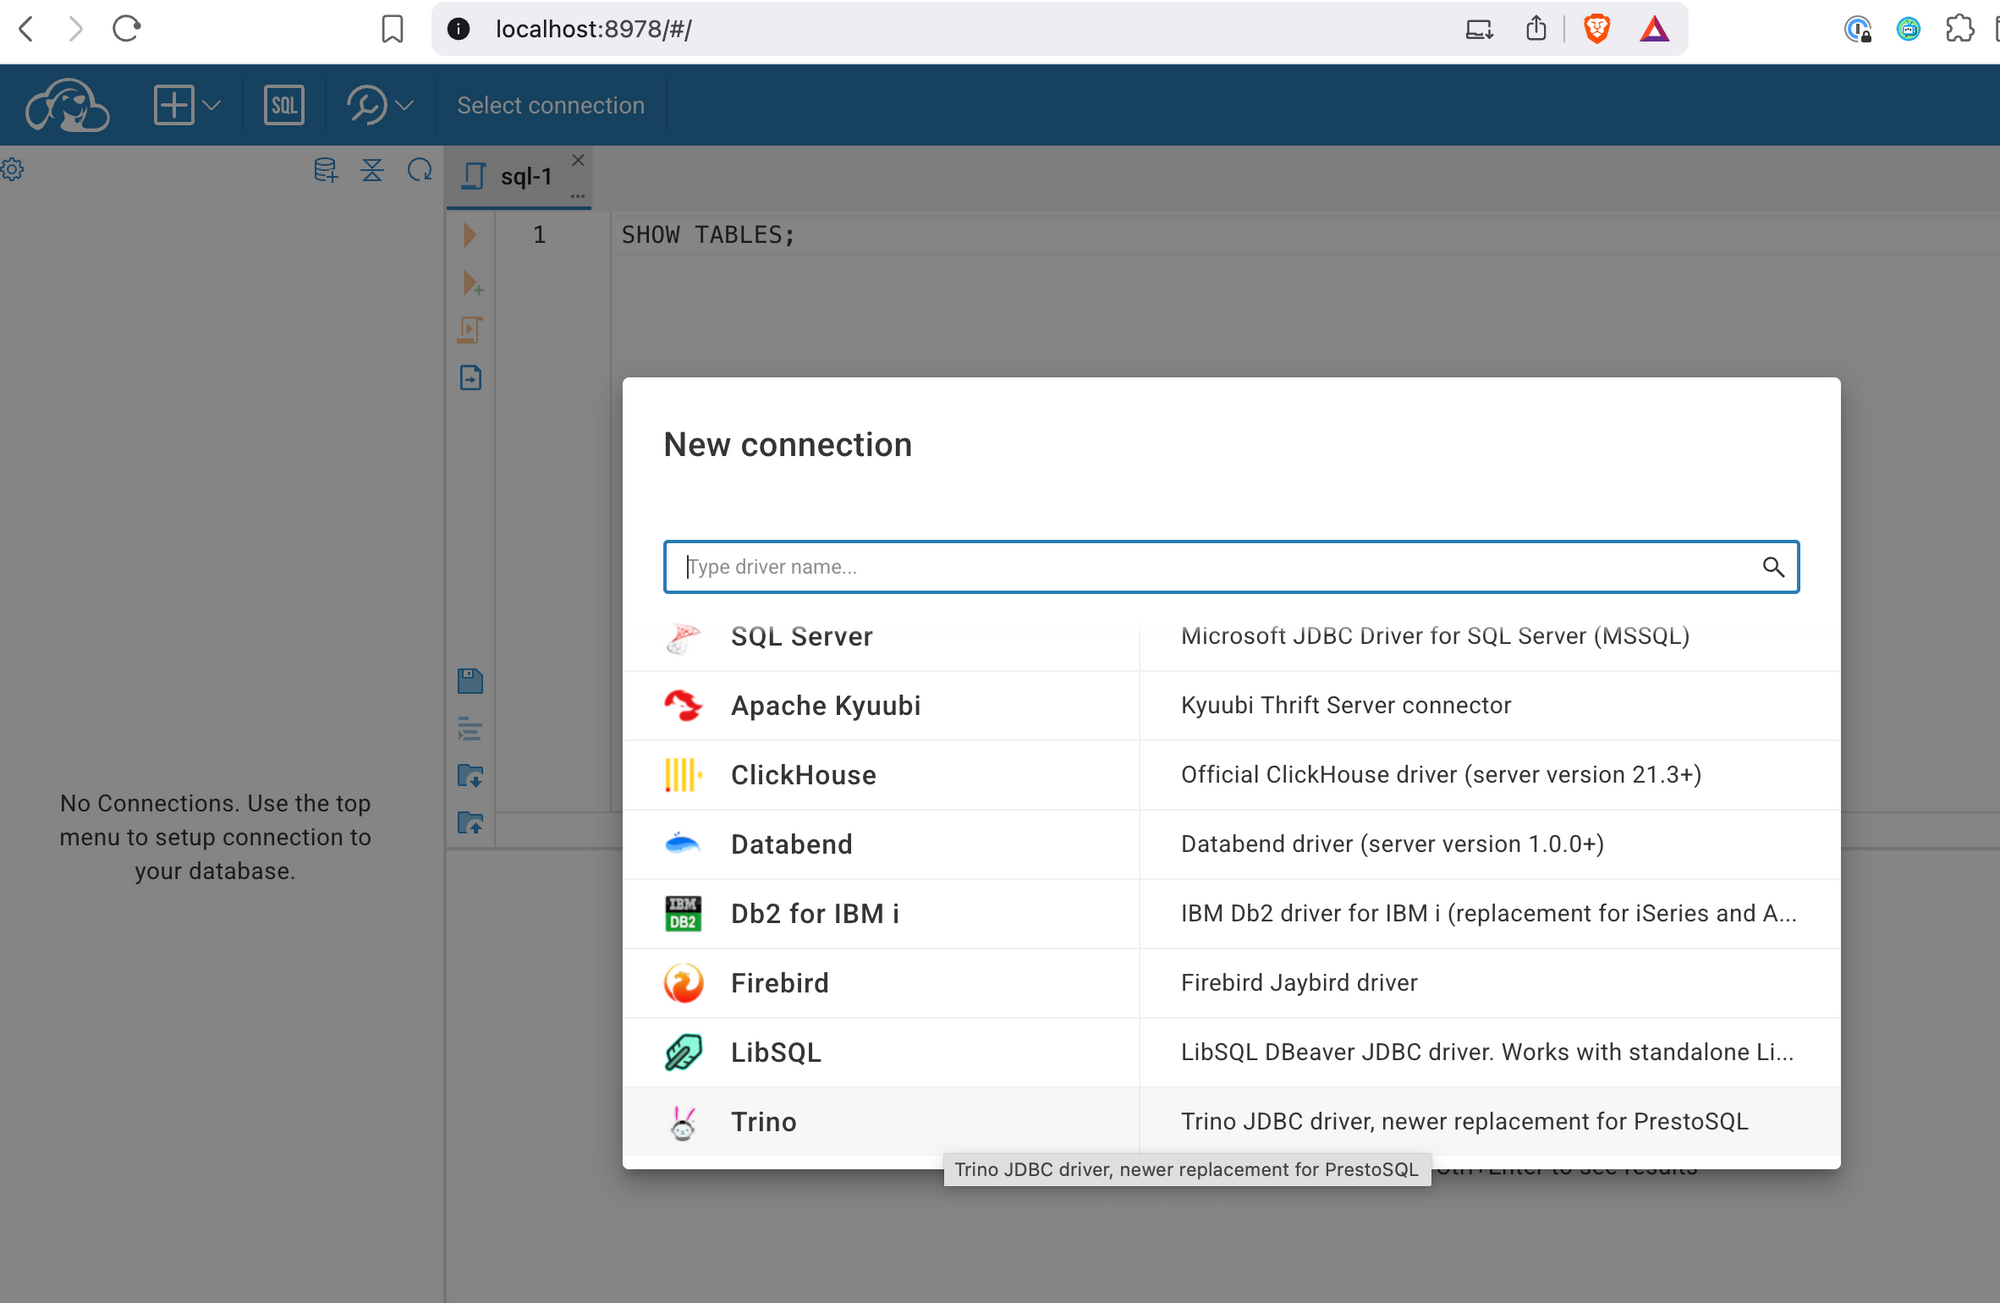
Use the following URL: jdbc:trino://trino:8080/tpch/tiny. Since we are using Docker Compose to start the services, CloudBeaver cannot connect to Trino using localhost—it must reference the service name defined in the Docker network (in this case, trino).
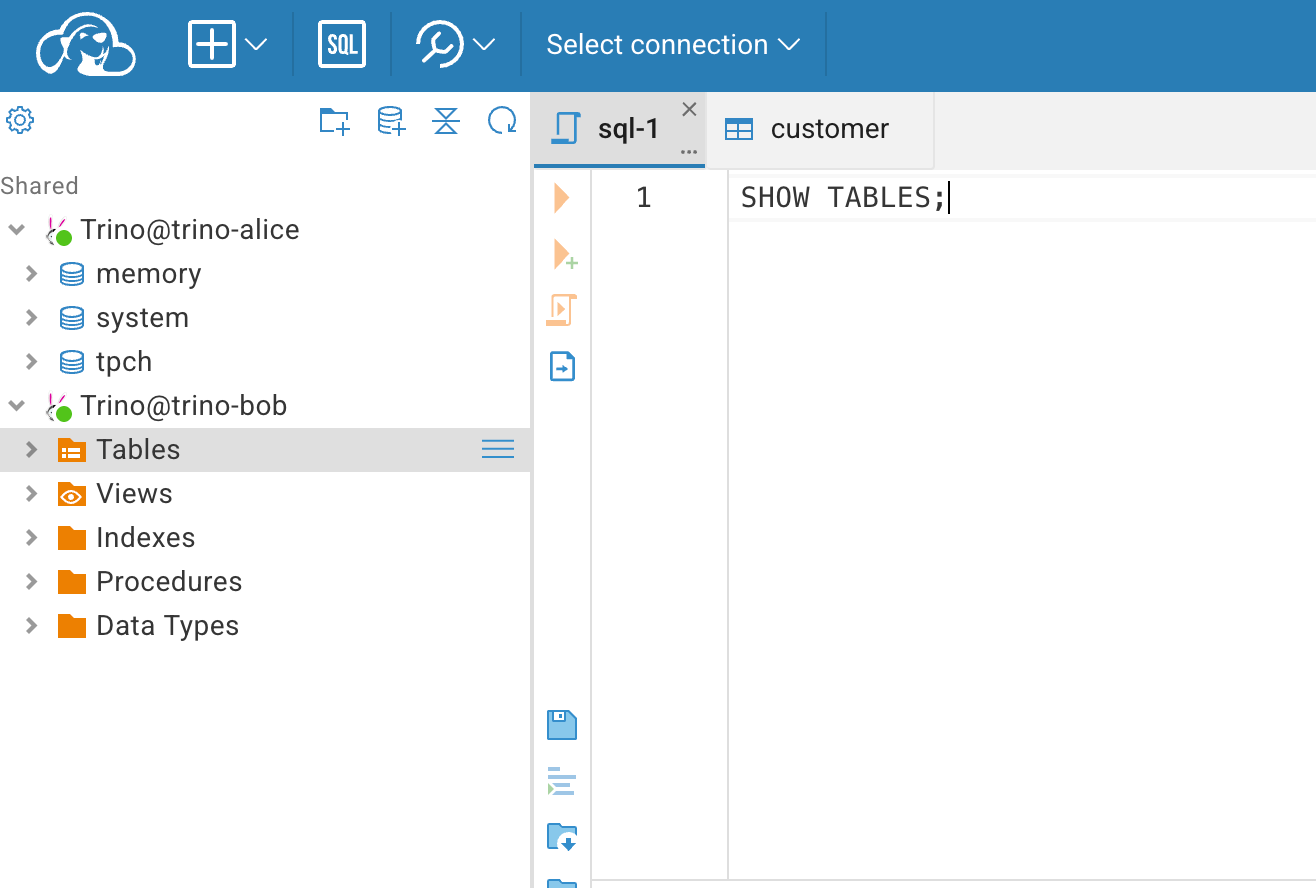
Next, we can observe the differences between the two connections. For Alice, you can view all the settings we configured in the Trino environment, including the memory and tpch catalogs. However, for Bob, you won't see anything because all operations are rejected by the OPA service.
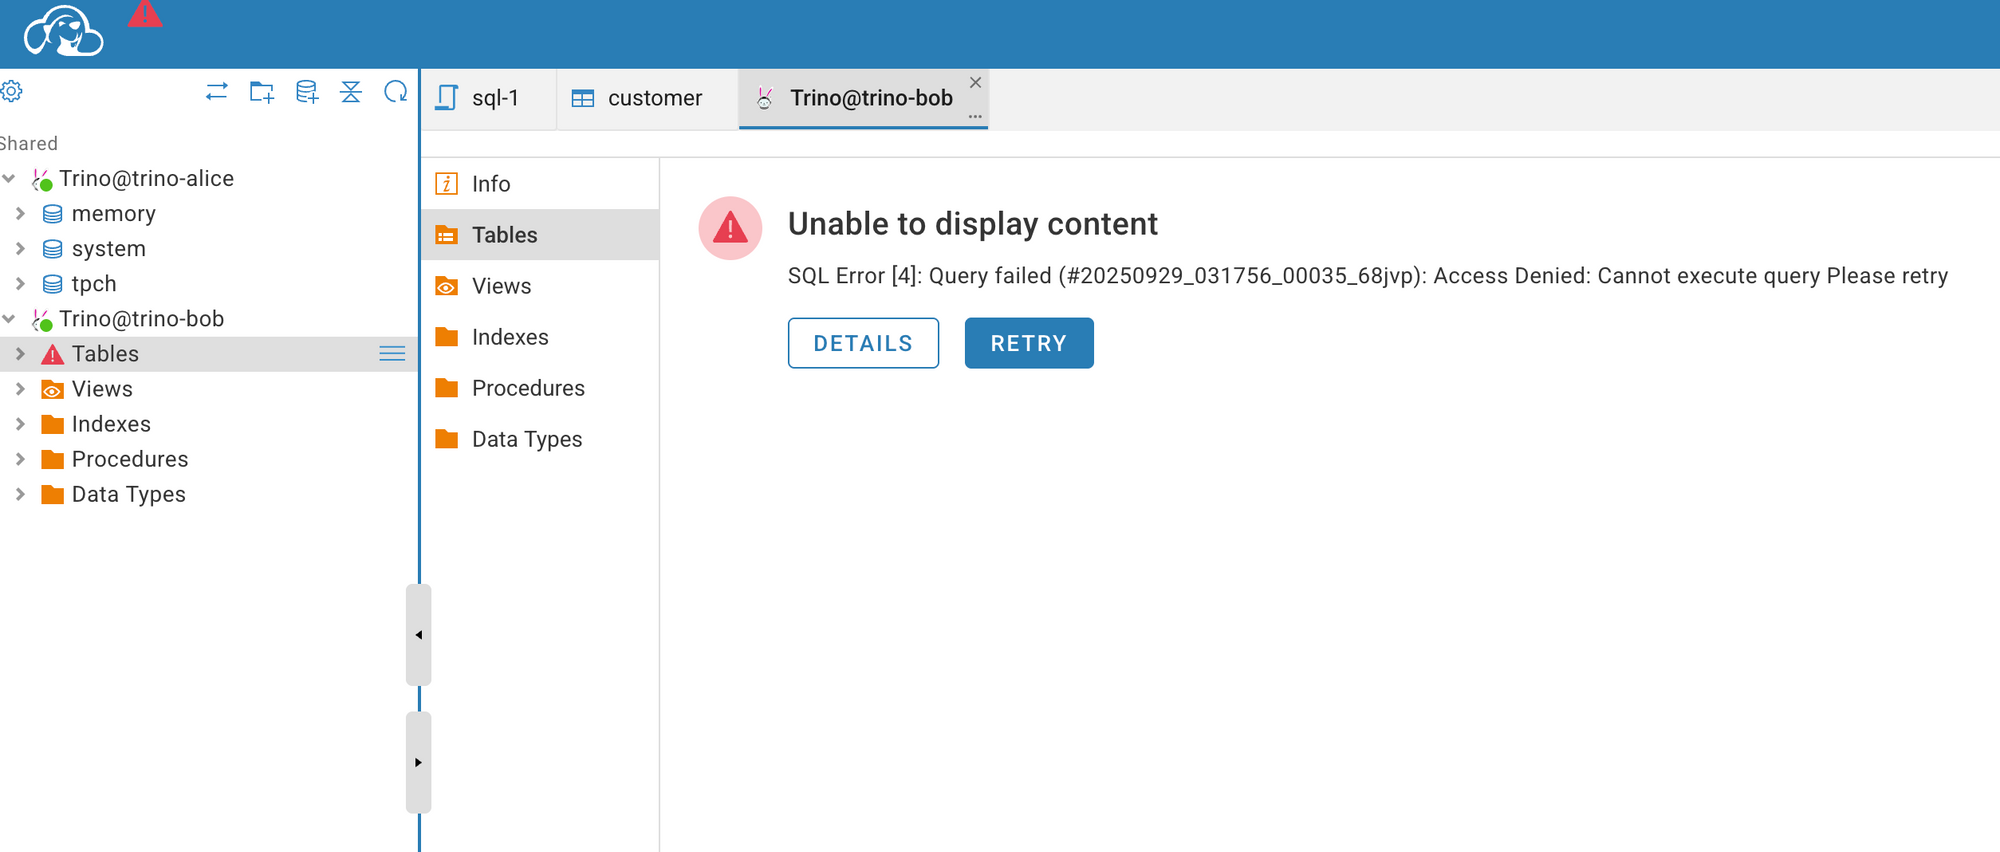
Perfect — everything is working as expected (poor Bob 😅). If you run into any issues, feel free to check out my GitHub repository for the complete project and setup instructions.
Takeaway
In this post, we demonstrated how to build a modern distributed SQL query engine with a user-friendly UI and an authorization solution that meets business-level data requirements — not just for handling large datasets, but also for enforcing data access control.

