Background
Continuing from the previous post, where we built the database layer and Liquibase migrations, this article shows how to define REST APIs in our Spring Boot Todo application. We'll walk through creating controllers, connecting them to services and repositories, and exposing CRUD operations that interact cleanly with the database.
Implementation
Today, we'll structure our API using the classic Spring Boot layered architecture: Controller, Service, and Repository. Each layer focues on a specific responsibility so the code stays clean, modular, and easy to maintain. This separation of concerns prevents business logic and persistence logic from mixing together, which greatly improves the scalability of the application.
src/
 └── main/
     ├── java/
     │   └── com/example/todolist/
     │       ├── TodolistApplication.java
     │       ├── model/
     │       │   └── Todo.java
     │       ├── repository/
     │       │   └── TodoRepository.java
     │       ├── service/
     │       │   └── TodoService.java
     │       └── controller/
     │           └── TodoController.java
     └── resources/
         ├── application.properties
         └── static/   (optional)
Controller
The controller layer is responsible for defining the API endpoints of the applicaion. Its main purpose is to handle incoming HTTP requests and return the appropriate HTTP responses. In this layer, we design what APIs our service will expose and determine which HTTP methods (GET,POST,PUT,DELTE, etc.) should be used to follow RESTful conventions.
A controller also performs input validation and converts requst payloads into Java objects when necessary. After validating the request, the controller delegates the business logic to the service layer. Once the operation completes, the controller prepares and returns a well-structured response, typically in JSON, back to client.
package com.example.todolist.controller;

import com.example.todolist.model.Todo;
import com.example.todolist.service.TodoService;
import org.springframework.web.bind.annotation.*;

import java.util.List;

@RestController
@RequestMapping("/api/todos")
public class TodoController {
    private final TodoService todoService;

    public TodoController(TodoService todoService) {
        this.todoService = todoService;
    }

    @GetMapping
    public List<Todo> getAllTodos() {
        return todoService.getAllTodos();
    }

    @PostMapping
    public Todo createTodo(@RequestBody Todo todo) {
        return todoService.createTodo(todo);
    }

    @PutMapping("/{id}")
    public Todo updateTodo(@PathVariable Long id, @RequestBody Todo todo) {
        return todoService.updateTodo(id, todo);
    }

    @DeleteMapping("/{id}")
    public void deleteTodo(@PathVariable Long id) {
        todoService.deleteTodo(id);
    }
}
Here is our controller code, we will go through it.
private final TodoService todoService;

public TodoController(TodoService todoService) {
    this.todoService = todoService;
}
Spring Boot sees that the @RestController on the class and The constructor that requires TodoService, and Spring will automatically creates (or “injects”) a TodoService object and passes it into the constructor.
The following methods are just simple GET,POST,PUT, and DELETE methods, very intuitive.
Service
Next, we move on to the service layer. As mentioned earlier, this is where we place the core business logic of the application. In the context of our Todo application, the service acts as the bridge between the controller and the repository.
Inside the service class, we inject the TodoRepository using Spring Boot's dependency injection mechanism. With the repository available, we implement the methods required by the controller - such as creating, updating, querying and deleting todo items. The service ensures that the controller stays clean and focused on handling requests, while all business rules and orchestration happen here.
This separation not only keeps the codebase modular and easily to maintain, but also simplifies testing because logic can be unit-tested independently from web or database layer.
package com.example.todolist.service;

import com.example.todolist.model.Todo;
import com.example.todolist.repository.TodoRepository;
import org.springframework.stereotype.Service;
import java.util.List;

@Service
public class TodoService {
    private final TodoRepository todoRepository;

    public TodoService(TodoRepository todoRepository) {
        this.todoRepository = todoRepository;
    }

    public List<Todo> getAllTodos() {
        return todoRepository.findAll();
    }

    public Todo createTodo(Todo todo) {
        return todoRepository.save(todo);
    }

    public Todo updateTodo(Long id, Todo updatedTodo) {
        return todoRepository.findById(id)
            .map(todo -> {
                todo.setTitle(updatedTodo.getTitle());
                todo.setDescription(updatedTodo.getDescription());
                todo.setCompleted(updatedTodo.isCompleted());
                return todoRepository.save(todo);
            })
            .orElseThrow(() -> new RuntimeException("Todo not found"));
    }

    public void deleteTodo(Long id) {
        todoRepository.deleteById(id);
    }
}
After reviewing the code, some of you may wonder where methods like setTitle, setDescription, and setCompleted are actually implemented. If we go back to the model layer, we can see that the class is annotated with Lombok‘s @Getter and @Setter. These annotations automatically generate the getter and setter methods for every field at compile time, which is why you don't see them explicitly defined in the source code.
@Entity
@Table(name = "todolist")
@Getter
@Setter
@NoArgsConstructor
public class Todo {
    @Id
    @GeneratedValue(strategy = GenerationType.IDENTITY)
    private Long id;

    @Column(nullable = false)
    private String title;

    private String description;

    @Column(nullable = false)
    private boolean completed = false;

    // UTC-safe creation timestamp
    @Column(nullable = false, updatable = false,
            columnDefinition = "TIMESTAMP WITH TIME ZONE DEFAULT CURRENT_TIMESTAMP")
    private Instant createdAt = Instant.now();

    // Custom constructor for creating new todos
    public Todo(String title, String description) {
        this.title = title;
        this.description = description;
    }

}
Repository
Now, let's look at the repository layer. Unlike Python and Django ORM, where you typically define model-specific query functions manually, Spring Boot makes this part extremely lightweight. All yu need to do is extend the JpaRepository interface, and Spring Data automatically generate the underlying implementation for you at runtime.
package com.example.todolist.repository;

import com.example.todolist.model.Todo;
import org.springframework.data.jpa.repository.JpaRepository;

public interface TodoRepository extends JpaRepository<Todo, Long> {}
JpaRepository provides a full set of CRUD operaions out of the box, including:
* save()
* findById()
* findAll()
* deleteById()
* count()
This means you can focus on business logic without writing boilerplate database access code.
P.S. <Todo, Long> explains two things:
- Todo = emtity type: "This repository works with the Todo table"
- Long = ID type: "The primary key type is Long"
Put everything together
Finally, we need to set up the entry point for the Spring Boot application. Once that is in place, I will show you how to use Maven to build and start the Spring Boot service from the command line.
package com.example.todolist;

import org.springframework.boot.SpringApplication;
import org.springframework.boot.autoconfigure.SpringBootApplication;

@SpringBootApplication
public class TodolistApplication {

	public static void main(String[] args) {
		SpringApplication.run(TodolistApplication.class, args);
	}

}
You can start the service by running the following command from the project's root directory. Just make sure you export your .env variables beforehand. To make things even easier, I've also prepared a Makefile so you can run these commands with simple shortcuts.
mvn spring-boot:run# Makefile for Liquibase Migration Management
# Provides Django-like commands for database migrations
# Load environment variables from .env file
-include .env
export
.PHONY: help run makemigration migrate migrate-one migrate-to showmigrations rollback rollback-preview fake-migrate fake-migrate-to fake-migrate-preview
# Default target
help:
@echo "=== Spring Boot Application Commands ==="
@echo ""
@echo "Application:"
@echo " make run - Start Spring Boot application (default port 8080)"
@echo " make run PORT=9090 - Start Spring Boot application on custom port"
@echo ""
@echo "=== Liquibase Migration Commands ==="
@echo ""
@echo "Migration Generation:"
@echo " make makemigration - Generate new migration (auto-numbered)"
@echo " make makemigration NAME=example - Generate migration with custom name"
@echo ""
@echo "Migration Execution:"
@echo " make migrate - Apply all pending migrations"
@echo " make migrate-one - Apply only the next pending migration"
@echo " make migrate-to NUM=0008 - Migrate to specific version"
@echo " make showmigrations - Show migration status"
@echo ""
@echo "Rollback:"
@echo " make rollback COUNT=1 - Rollback N changesets (default: 1)"
@echo " make rollback-preview COUNT=1 - Preview rollback SQL"
@echo ""
@echo "Fake Migrations:"
@echo " make fake-migrate - Mark all pending as executed"
@echo " make fake-migrate-to NUM=0008 - Mark up to version as executed"
@echo " make fake-migrate-preview - Preview what would be marked"
@echo ""
# Variables
CHANGES_DIR := src/main/resources/db/changelog/changes
MVN := mvn
NAME ?= auto_generated
COUNT ?= 1
PORT ?=
# Application Commands
run:
ifdef PORT
@echo "Starting Spring Boot application on port $(PORT)..."
@$(MVN) spring-boot:run -Dspring-boot.run.arguments="--server.port=$(PORT)"
else
@echo "Starting Spring Boot application on default port (8080)..."
@$(MVN) spring-boot:run
endif
# Auto-detect next migration number
LATEST_NUM := $(shell ls $(CHANGES_DIR) 2>/dev/null | grep -E '^[0-9]+' | sed 's/^0*//' | sed 's/[^0-9].*//' | sort -n | tail -1)
ifeq ($(LATEST_NUM),)
NEXT_NUM := 1
else
NEXT_NUM := $(shell echo $$(($(LATEST_NUM) + 1)))
endif
NEXT_FORMATTED := $(shell printf "%04d" $(NEXT_NUM))
# Migration Generation
makemigration:
@echo "Generating migration $(NEXT_FORMATTED)_$(NAME).yaml..."
@if [ ! -d "$(CHANGES_DIR)" ]; then \
echo "Error: Directory $(CHANGES_DIR) does not exist"; \
exit 1; \
fi
@FILEPATH="$(CHANGES_DIR)/$(NEXT_FORMATTED)_$(NAME).yaml"; \
$(MVN) liquibase:diff -Dliquibase.diffChangeLogFile=$$FILEPATH; \
if [ -f $$FILEPATH ]; then \
echo "" >> $$FILEPATH; \
echo "- changeSet:" >> $$FILEPATH; \
echo " id: tag-$(NEXT_FORMATTED)" >> $$FILEPATH; \
echo " author: taiker" >> $$FILEPATH; \
echo " changes:" >> $$FILEPATH; \
echo " - tagDatabase:" >> $$FILEPATH; \
echo " tag: \"$(NEXT_FORMATTED)\"" >> $$FILEPATH; \
echo "✓ Migration created: $$FILEPATH"; \
echo "✓ Tag $(NEXT_FORMATTED) added"; \
else \
echo "Error: Failed to generate migration file"; \
exit 1; \
fi
# Migration Execution
migrate:
@echo "Applying all pending migrations..."
@$(MVN) liquibase:update
migrate-one:
@echo "Applying next pending migration..."
@$(MVN) liquibase:updateCount -Dliquibase.count=1
migrate-to:
@if [ -z "$(NUM)" ]; then \
echo "Error: NUM parameter required. Usage: make migrate-to NUM=0008"; \
exit 1; \
fi
@echo "Migrating to version $(NUM)..."
@$(MVN) liquibase:updateToTag -Dliquibase.toTag=$(NUM)
showmigrations:
@echo "Checking migration status..."
@$(MVN) liquibase:status
# Rollback
rollback:
@echo "Rolling back $(COUNT) changeset(s)..."
@$(MVN) liquibase:rollback -Dliquibase.rollbackCount=$(COUNT)
rollback-preview:
@echo "Previewing rollback of $(COUNT) changeset(s)..."
@$(MVN) liquibase:rollbackSQL -Dliquibase.rollbackCount=$(COUNT)
@echo ""
@echo "Preview saved to: target/liquibase/migrate.sql"
# Fake Migrations
fake-migrate:
@echo "Marking all pending migrations as executed (without running them)..."
@$(MVN) liquibase:changeLogSync
fake-migrate-to:
@if [ -z "$(NUM)" ]; then \
echo "Error: NUM parameter required. Usage: make fake-migrate-to NUM=0008"; \
exit 1; \
fi
@echo "Marking migrations up to $(NUM) as executed (without running them)..."
@$(MVN) liquibase:changeLogSyncToTag -Dliquibase.toTag=$(NUM)
fake-migrate-preview:
@echo "Previewing what would be marked as executed..."
@$(MVN) liquibase:changeLogSyncSQL
@echo ""
@echo "Preview saved to: target/liquibase/migrate.sql"
You can use the make run to start the service, and you will find the service has been started and listened to the 8080 port.
$ make run
Starting Spring Boot application...
...
...
2025-11-30T17:39:23.018+08:00  INFO 62999 --- [todolist] [           main] o.h.e.t.j.p.i.JtaPlatformInitiator       : HHH000489: No JTA platform available (set 'hibernate.transaction.jta.platform' to enable JTA platform integration)
2025-11-30T17:39:23.019+08:00  INFO 62999 --- [todolist] [           main] j.LocalContainerEntityManagerFactoryBean : Initialized JPA EntityManagerFactory for persistence unit 'default'
2025-11-30T17:39:23.078+08:00  WARN 62999 --- [todolist] [           main] JpaBaseConfiguration$JpaWebConfiguration : spring.jpa.open-in-view is enabled by default. Therefore, database queries may be performed during view rendering. Explicitly configure spring.jpa.open-in-view to disable this warning
2025-11-30T17:39:23.183+08:00  INFO 62999 --- [todolist] [           main] o.s.b.w.embedded.tomcat.TomcatWebServer  : Tomcat started on port 8080 (http) with context path '/'
2025-11-30T17:39:23.186+08:00  INFO 62999 --- [todolist] [           main] c.example.todolist.TodolistApplication   : Started TodolistApplication in 6.397 seconds (process running for 6.501)
If you want the application to run on a different port, you can specify it when using the make run command, for example:
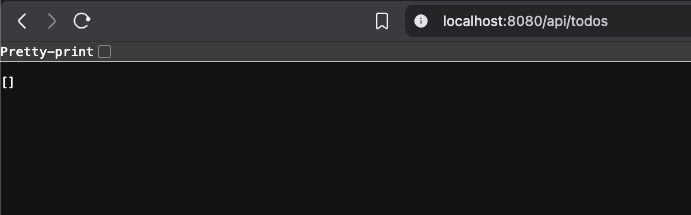
make run PORT=9090Once the service is running, open your browser and navigate to:
http://localhost:8080/api/todos
or
http://localhost:9090/api/todos if you chose a custom port.
Since the database is still empty, the API will return an empty list, which means the setup is working correctly.
Deployment
If you want to deploy this application to another environment - such as a server, VM or even a cloud instance - and run it "like a real production service,” you first need to package the project into a JAR file. To do that, run the following Maven command:
export $(cat .env | xargs)
mvn clean package
Spring Boot will create:
$ target/todolist-0.0.1-SNAPSHOT.jar
[INFO] --- jar:3.4.2:jar (default-jar) @ todolist ---
[INFO] Building jar: /Users/taiker/dev/todolist/target/todolist-0.0.1-SNAPSHOT.jar
The version in your JAR name comes from your pom.xml
<version>0.0.1-SNAPSHOT</version>So the output JAR will always follow:
<artifactId>-<version>.jarThen you can start the Sprint Boot service using Java:
$ java -jar target/todolist-0.0.1-SNAPSHOT.jar

# or run in different port

$ java -jar target/todolist-0.0.1-SNAPSHOT.jar –server.port=9090
Takeaway
In this post, we walked through how to build RESTful APIs in Spring Boot using the Controller, Service and Repository layers to complete a basic CRUD workflow for our Todo application. We also explored multiple ways to start the service - with and without the Makefile - and covered how to bild a JAR file and run the application like a real deployed service.
In the next post, we'll take the project one step further and focus on writing effective unit tests in Spring Boot, including how to test controllers, services, and repository behavior with clean, maintainable test patterns.

